Category: Tutoriale
What you’ll need:
– Jewelry wire (I prefer using a 24 gage because it is easier to manipulate but the 20 gage can work well too with the help of some round nose pliers)
– pearls or glass beads
– necklace chain
– jump ring and a clasp
Select the beads you want, string them onto your wire and arrange them as you’d like.

then simply wrap the wire around the beads

wrap some wire in the space between each bead (I like the look of three loops but you could just do one or two if you prefer)

this is what the back looked like. (In the other necklaces I attached a jump ring but on this one I just formed a loop with the wire.)

now attach a jump ring and a clasp to the end of a necklace chain 
and this is what you end up with 🙂

I love how each one is so different!

There’s something wonderful and feminine about a delicate chain of tiny flowers. Whenever I see a white and yellow daisy chain necklace, I think of the poet Sappho, singing with friends and weaving flowers together in the warm Mediterranean sunshine. A strand of beaded daisies can brighten up any outfit with it’s springtime charm, and it never needs watering!
The basic daisy chain stitch is probably the simplest bead weaving technique ever created, and it is often taught to children in art class and at summer camp. Perhaps it is because of this that it is often over looked in the realm of serious beading. Although mastering the technique may be child’s play, once you know how to do it, you can incorporate it into even the most elaborate projects. It’s great for fringe and embellishment as well as making chains.

To make a classic daisy chain, start by adding a stop bead to a comfortable length of beading thread. Pick up one bead, slide it down until there is about a 6 inch tail, and stitch back up through the bead to secure it.

Next, pick up six white seed beads. Slide these down to the stop bead, then pass the needle up through the first bead added, moving towards the other five beads. Hold this first bead in place close to the stop bead as you gently pull the working thread snug. The beads should now form a tiny ring.
Pick up one yellow seed bead. Pass the needle up through the fourth white bead picked up in the previous step. To double check your thread path, count the white beads to make sure that there are two on either side of the first bead and the one you are stitching through.
Gently pull the thread snug, and nudge the yellow bead into place at the centre of the ring of white beads. Tug the working thread to make sure that the daisy is secure.

You can now repeat these steps and add a second daisy against the first, continuing on to make a tightly woven chain of flowers. To help distinguish each flower from the next, try using two or more sets of colors and alternate them with each new daisy.

Another variation is to add spacer beads between each flower like stems. Simply pick up one or more beads in a contrasting color before adding a new daisy. Make sure that the new flower is snug against the stem beads as you stitch to keep the tension even. You can also add accent beads or leaf fringe between daisies for lots of pretty texture.

Although the white and yellow flower is instantly recognized as a daisy, there are lots of other natural color combinations that you can use. Try using yellow and brown for Brown Eyed Susans, purple and yellow for violets, or pink and yellow for wild roses. The round shape of the daisy chain can also be used to make fruits or berries when all seven beads are the same color.
Daisy chain is a great technique to use when you need a quick project. You can use up leftover beads from other projects for an instant gratification necklace or bracelet. If you don’t shy away from the ordinary, you never know what you might come up with!
This wire wrap rings tutorial is a very fast and easy project. You can quickly make a ton of these from bits of wire left over from other projects, or from a pile of new wire pieces you cut to size.
They’re comfortable and adjustable – and, as you’ll see at the end of this tutorial, there are endless creative ways you can embellish this basic design.
This is another great jewelry-making project for teenagers or pre-teens.
They would especially enjoy fancying these up with some of the variations I list at the end of this tutorial!
And these rings are very cheap to make – using copper or brass you can make them for less than 5 cents each – or about 20 of them for $1.
If you sell them, I’ve found that $3 per ring is a price that’s very profitable for me, and my customers feel that it’s a good value for them.
I’ve sold loads of these little wire rings at craft shows and other events where I’ve displayed them in a charming little wooden box.
I originally intended them to be an impulse-purchase item for little girls (which has been a very successful strategy) – but I soon discovered that teens and adults were also drawn to them, especially to wear as pinkie or toe rings.
So if you’re making these to sell, you may want to also make some larger ones to fit adults.
Supplies:
1. Soft or half-hard round wire, in 16-, 18- or 20-gauge. You’ll need a piece that’s somewhere between 3″ (7.6 cm) and 5″ (12.7 cm) long, depending on how big you’d like to make your ring, and how fancy you plan to get with the two ends of it.
For the basic ring I made in this tutorial, I used a 3″ (7.6 cm) piece of 18-gauge copper wire; the finished ring fits up to size 4.5 in the U.S. (U.K. size I, Europe size 7.97).
2. Flush cutter / side cutter for cutting your wire.
3. Round nose pliers.
4. Ring mandrel, dowel, or other item you can wrap the wire around to form it into a ring.
How to Make
Wire Wrap Rings
Start out with the piece of wire you’ve cut to somewhere between 3″ (7.6 cm) and 5″ (12.7 cm) long:

Then use your round-nose pliers to turn a small loop at each end of the wire:

The two loops should be facing in opposite directions:

Then wrap your wire piece around your mandrel or dowel. The wire loops you made should overlap slightly, so the finished ring can adjust slightly to a larger size while still completely circling the wearer’s finger:

And that’s all there is to it, for creating the basic wire wrap rings.
You may want to run them through your tumbler if you have one, to harden and polish them up a bit.
Or you may want to move on to doing something fancier with this basic project:
Ideas for Variations
* Instead of shaping your wire ends into simple loops, make them in to big spirals or other geometric shapes.
* Give your wire wrap rings a hammered texture.
* Use twisted square wire instead of round.
* Oxidize or patina the finished ring.
* Use colorful Artistic Wire instead of copper, brass, or silver. Consider twisting two or more colors together.
* Add a bead or two to the design.
* Dangle a tiny charm or stamped tag from one of the ring’s loops.
* Make one of the end loops fairly large, and use a piece of 24-gauge wire to wire-wrap a bead into it.
Source: http://jewelrymakingjournal.com
This easy wire hoop earrings tutorial adds a graceful inner spiral that brings extra style and interest to the design.
These earrings are super light-weight and comfortable to wear.
They’re also quick to make – and if you’re making them to sell, you can whip up several of them in a short period of time.
Supplies:
Two 6″ (15.24 cm) pieces of 18-gauge round soft wire (I used copper).
Wire-cutter.
Round nose pliers.
Flat-nose or chain-nose pliers.
Ring mandrel, pill bottle, dowel, PVC pipe section, or other cylindrical item that’s about 1″ (2.54 cm) in diameter.
Two jump rings.
Two earwires.
OPTIONAL: Nylon or rawhide hammer and jewelry steel block for flattening and hammering-hardening your finished earrings.
How to Make the
Zen Spiral Hoop Earrings:
(1) Cut two 6″ (15.24 cm) pieces of 18-gauge round soft wire:

(2) Wrap each wire around the fat end of your ring mandrel (or pill bottle, etc.). The two wire ends will probably be just short of making two full wraps around the mandrel:

(3) Now your two wires should look like this:

(4) Pick up one of your newly coiled wires, and with the thin tip of your round-nose pliers grasp one end of the wire. Start curving it into the beginning of a smooth spiral inside the hoop:

(5) Move your pliers along the wire slightly, and use a slightly fatter part of your round-nose tips to keep curving your wire into a loose spiral:
(6) Keep moving your pliers along the wire and using fatter and fatter parts of your round-nose tips to continue the loose spiral, until your wire looks like this:

(7) Now use the fattest part of your round-nose pliers to grasp the other end of your wire. Start curling the wire end into a loop:

(8) Keep curling the wire around until you have a double loop around one jaw of your pliers:
(9) Repeat Steps 4 through 8 on your other wire. Now your wires should look like this:

(10) OPTIONAL: Use your jewelry steel block and nylon / rawhide hammer to flatten and hammer-harden your newly shaped earrings:

(11) Attach a jump ring to the double loop at the top of each earring. Then attach an earwire to each jump ring:

Enjoy your lovely Zen Spiral earrings!
Ideas for Variations:
Use a tumbler instead of the hammer and jewelry steel block to harden the Zen spiral hoops.
Oxidize your hoops instead of leaving them shiny.
Color your hoops with a patina.
Add one or more bead dangles to the hoops.
Source: http://jewelrymakingjournal.com


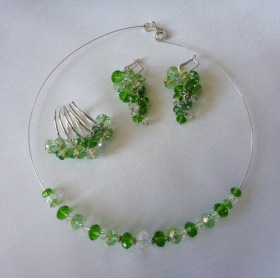
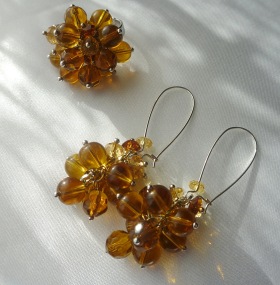
 Universul meu-AdinaAmironesei
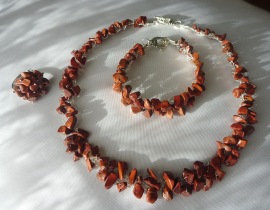
 Frumuseti din adancul pamantului